A Detailed Guide to Making DIY Sensory Bottles
As caregivers and parents, coming up with activities that promote sensory development and exercise young minds is not always an easy task. One of the easiest yet incredibly effective tools is “sensory bottles”. These vibrant, interactive bottles are not just beautiful to look at— they hold amazing developmental benefits for infants, toddlers, and preschoolers. This guide will take you through all that you need to know about “sensory bottles”, how to make them, and how to use them in early childhood development.
1. What Are Infant Sensory Bottles?
“Infant sensory bottles” refer to transparent containers that are filled with different materials to stimulate the senses of an infant. The sensory bottles generally focus on engaging vision, hearing, and touch, which are very important during the initial months of a baby’s life.
Unlike conventional toys, “infant sensory bottles” use visually appealing colors, calming liquids, or sound-producing objects to engage babies. The soft motion and vibrant colors of the materials can captivate an infant’s attention, inducing calmness and focus.
Read More: Best Guide about Iron in Food for Babies: 2025
2. Advantages of Sensory Bottles for Early Childhood Development
Sensory Bottles play is important for all children, particularly in the early years of life. “Sensory bottles” help infants and toddlers in the development of fine motor skills, hand-eye coordination, sensory awareness, and cognitive skills.
• Fine Motor Skills: Shaking or stirring sensory bottles helps babies achieve finer motor control and strengthen their grasping skills.
• Concentration and Relaxation: The soothing experience of observing the contents churning and swirling within a bottle can calm infants, which makes sensory bottles perfect for quiet time.
• Brain Development: Sensory bottles provide an easy yet effective means of teaching children cause and effect. For instance, shaking a bottle and observing objects in motion teach babies about gravity and movement.
3. DIY Sensory Toys for Infants: Making Engaging Sensory Bottles
Making your own “DIY sensory toys for infants” doesn’t need to be complicated. Sensory bottles are easy to create and can be customized to suit your baby’s age, interests, and developmental needs.
What You’ll Need:
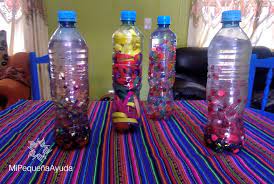
• Plastic Bottles or Jars: Small, clear bottles with a secure lid are ideal for “making sensory bottles”. Baby food jars or empty water bottles work well.
• Filler Materials: Select safe, non-toxic materials. Materials can be glitter, pom-poms, rice, small beads, or liquid such as colored water or vegetable oil.
• Adhesive or Glue: To seal the bottle tight.
• Colorful elements: Little toys, buttons, or natural items such as leaves or shells can provide eye appeal.
Also Visit: Food Allergies in Babies: Best Guide of 2025
Step-by-Step Guide to Making Sensory Bottles:
1. Select the Proper Bottle: Start with a small plastic jar or bottle. Ensure the lid screws tightly to prevent any possibility of choking hazards.
2. Select Your Filler Materials: Choose materials that will engage your baby’s senses. For instance, use water and glitter for a soothing “sensory water bottle”, or rice and small beads for touch feedback.
3. Fill the Bottle: Add your chosen filler to the bottle, with a small amount of space at the top for easy movement of the contents.
4. Seal the Bottle: Tighten the lid well and attach glue to hold it in place, avoiding any possible openings.
5. Try out the Bottle: Gently shake the bottle and observe as the contents within stirred. If it looks happy, you are done! Otherwise, you may need to try new materials or liquids until they look perfect.
Visit Here: The Hidden Benefits of Being a Stay at Home Mom That Nobody Talks About
4. Sensory Bottle Concepts: Great and Engaging Ideas
What makes “sensory bottles DIY” beautiful is the world of possibilities concerning creative experimentation. These are some fun and engaging “sensory bottle ideas” suitable for different purposes of developmental exploration:
Sensory Bottles Based on Water:
One of the most favored options for babies is a “sensory water bottle.” Fill with clear liquid or colored water and add glitter, small toys, or beads inside. When the bottle is moved, the glitter and objects will swirl and float, creating visual stimulation.
• Materials: Clear water, glitter, food coloring.
• Developmental Benefits: Visual tracking, concentration, and calming effects.
Sound Sensory Bottles:
For sound stimulation, prepare “sensory bottles for babies” using materials that produce sound, i.e., small beads, rice, or buttons. Infants will enjoy listening to the gentle rattling sounds.
• Materials: Rice, beans, little bells, or beads.
• Developmental Benefits: Auditory skills, cause and effect.
Read More: 7 Essential Nutrients for Strengthening the Child’s Immunity
Texture Sensory Bottles:
To stimulate a baby’s sense of touch, fill the bottle with materials with varied textures. Fill it with soft fabric patches, beads, or even scraps of fabric to be swirled within the bottle.
• Materials: Fabric fragments, pom-poms, cotton balls.
• Developmental Benefits: Tactile stimulation and exploration of texture.
For a special touch, create a glow-in-the-dark sensory bottle using glow-in-the-dark stars or paint for a bottle that will glow in dark environments, opening up a whole new way of stimulating your baby’s eyesight.
• Materials: Glow-in-the-dark paint or stars.
• Developmental Benefits: Tracking with the eyes, soothing.
5. Homemade Sensory Bottles for Toddlers and Preschoolers
As toddlers and preschoolers, children’s sensory needs change. Sensory bottles for toddlers and preschool sensory bottles may be prepared using more complex objects to develop intellectual and problem-solving abilities.
Adapting Sensory Bottles for Older Kids:
• More Interactive Items: Introduce small pieces of a puzzle, number or alphabet beads, or a piece of the face of a favorite character.
• Themed Sensory Bottles: Develop bottles with themes for your child’s passion—animals, the ocean, or space.
• Incorporate Challenges: For instance, create a bottle with a tiny object in it and invite the child to shake and attempt to locate it.
These “literally homemade sensory toys” can be interactive, toddlers and preschoolers can practice patience and problem-solving as they work out how to play with the bottle.
Read More: Finding the Best Milk for Toddlers: 2025
6. Hand to Mind Sensory Bottles: Store-Bought or Homemade
Both store-bought and homemade “hand to mind sensory bottles” have their advantages. Although store-bought ones may be handy and have professional designs, preparing your own “homemade sensory bottles” provides you with absolute control over what you use. Homemade sensory toys are also adaptable, and you can design the sensory experience based on your child’s needs.
• Pros of DIY Sensory Bottles: Cost-savviness, creativity, customizable.
• Cons of DIY Sensory Bottles: Demands effort and time, supervised attention needed.
• Pros of Commercial Sensory Bottles: High-quality material, professional designs.
• Cons of Commercial Sensory Bottles: Expensive, less customization.
7. Safety Reminders and Precautions When Using Sensory Bottles
• There Should be Close Supervision: Supervise children when engaging in sensory bottles for safety against any form of damage or mishaps, most particularly for babies.
• Inspect for Leaks: Make sure the lid fits well to prevent any leaks.
• Safety First: Utilize baby-safe, non-toxic materials only. No small parts that may be hazardous for choking.
• Age-Appropriate Materials: Use materials that are appropriate according to your child’s developmental phase.
Visit Here: The Ultimate Guide to Sleep Training Twins: A Stress-Free Path to Peaceful Nights
Conclusion
Sensory bottles are a great but effective means of encouraging sensory play in infants, toddlers, and preschoolers. Be you making “DIY sensory toys for infants” or “sensory bottles for preschoolers”, such engaging and visually appealing bottles are filled with numerous developmental advantages ranging from fine motor development to intellectual development. Through these easy-to-follow instructions, you can prepare your own “sensory bottles DIY”, incorporating fun as well as learning in your child’s play sessions.
The best news? You can create your own “make your sensory bottles” using a few basic materials. So, what are you waiting for? Get out a bottle and start today!